To connect the electricity in each apartment or private home electrical distribution board is needed. The size and its filling depend on the number of electrical appliances connected.
Contents
- 1 What is an electrical panel and what it is for
- 2 Drawing a diagram of the electrical panel
- 3 Principles of distributing electricity consumers into groups
- 4 How to choose a good electrical panel?
- 5 Assembling and mounting the switchboard on the wall
- 6 How to make a scheme of the switchboard
- 7 Adjusting and operating the switchboard
What is an electric switchboard and what is it for?
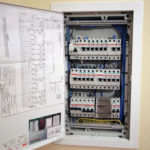
Electric switchboard - is assembled in one place circuit breakers, RCD, voltage relays and other devices designed to protect and disable the electrical appliances connected after it.

Switchboards can include outlets, electric meter, ammeters and other devices.
Electric boards in an apartment or private house are installed near the entrance, in a place that prevents water from getting on it.
The contents of the panel determines the convenience of electrical appliance control. For example, you can turn on and off all electric heating or outdoor lighting at the same time, from one place.
Drawing a diagram of the electrical panel
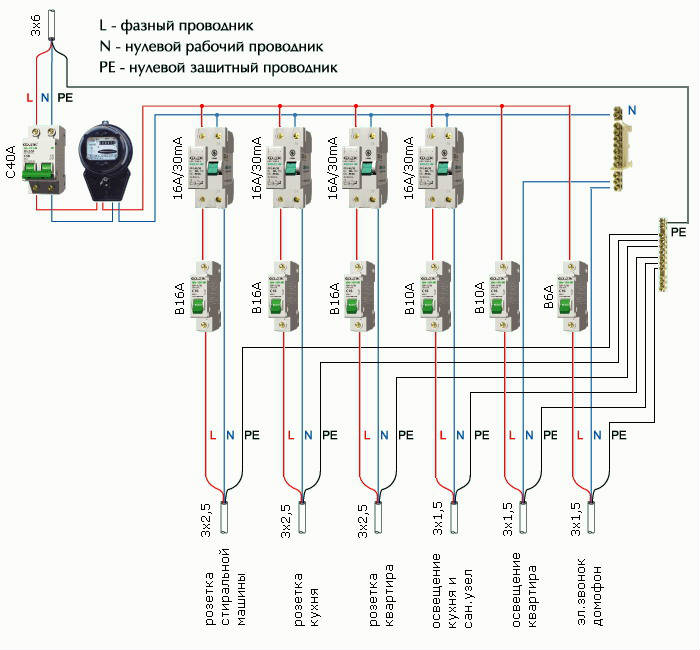
Before assembling the electrical panel, it is necessary to make its scheme. It is made according to the wiring diagram in the apartment. On it, all the equipment is located in the distribution board in the apartment, after the electric meter.
According to the wiring diagram is determined by how many circuit breakers and their rating, the parameters of RCDs and other devices.
Consumers of electricity can be divided into groups, each of which corresponds to its own automatic circuit breaker. This is indicated on the circuit diagram of the electrical switchboard.
Important! Compiled according to the rules of PUE (Rules for Electrical Installation) circuit diagram is important for the proper installation of distribution boards.
 Principles of distributing electric consumers by groups
For ease of service, consumers are divided into groups, each of which is disconnected by a separate circuit breaker installed in the electrical distribution board.
Electric networks are divided into groups according to different criteria:
- By amperage. A separate high-current circuit breaker disconnects electric stoves and electric heating, and a low-current circuit breaker disconnects lighting. This is because the rated current of the circuit breaker to which the stove is connected is higher than the allowable current for the cable laid in the network for lighting. Therefore, this circuit breaker will not be able to protect this wire.
- By direction. Electrical wiring going to different parts of the apartment or house and the garage are disconnected by separate circuit breakers for ease of use.
- By function. Outlets and lighting, interior and exterior lighting, working lighting and emergency lighting.
Is a RCD necessary?
RCD or differential circuit breaker, is installed to protect people from electric shock.
These devices operate on the principle of comparing currents in the neutral and phase conductors. In a fault-free network, these values are equal. If the insulation between energized parts of electrical equipment and an earthed enclosure is broken or a person touches such parts, this equilibrium is broken, causing the protection to activate.
Such devices are differentiated by triggering current and are connected one for the whole house or several, one in each part of the electrical circuit.
Important! Installing an RCD in the network can save the health or life of people living in the house.
The difference between an RCD and a differential circuit breaker is that the circuit breaker combines the functions of an RCD and a circuit breaker. It is more expensive than both of these devices together, but takes up less space in the switchboard.
Installing a voltage relay
All household appliances and electronics are designed for 220V. But in case of accidents in the power grid - zero wire burnout, short circuit between the zero and the phase wires and in other cases, it can increase to 380V, which leads to the failure of equipment.
Voltage drop below the permissible limits is also dangerous - if the TV set or computer just will not turn on, then the compressor of the refrigerator and air conditioner will burn out.
To prevent such situations, a voltage relay PH is installed.
In contrast to the RCD, such a device is needed only one, with a rated current not less than that of the input circuit breaker.
How to calculate the number of places in the electrical panel
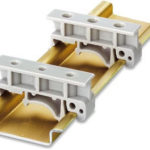
In modern panels the equipment is installed on a DIN-rail. This is a shaped steel, less plastic, strip, on which the automatic machines and other devices are installed. At the base of these devices have special slots and latches that they are attached to the rail.
The width of all circuit breakers, RCDs and other protection devices mounted on a DIN rail is standard and measured in modules. The size of one module is equal to the width of a single-pole circuit breaker.
To determine the number of places in the switchboard is necessary:
- make a diagram of the electrical panel;
- according to this scheme to write a list of all installed equipment with an indication of the width in modules;
- calculate the total width of all devices.
Important! The width of the starter panel is also measured in modules. This is the size of the opening for the installation of electrical appliances. In some designs, it can be increased by breaking out the plates in the outer cover.
How to choose a good starter panel?
The quality and reliability of the starter panel in the house depends mainly on the quality of the equipment, but what kind of switchboard will be, also matters.
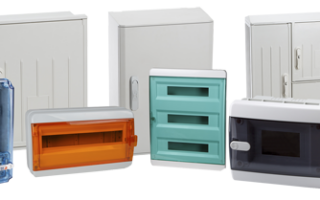
There are different types of apartment electric boards. The choice depends on the number of modules and specific conditions. Preference should be given to plastic shields, which have the following qualities:
- Metal, not plastic DIN-rail is installed inside - such rail provides a more secure attachment of protective equipment;
- hinged lid - further protects the automatic machines from accidental start-up and mechanical damage;
- there is a terminal block for grounding wires - in its absence and in the presence of grounding the terminal block will have to be installed additionally.
Help! In cables the insulation of the grounding wire is yellow or yellow-green.
With a large number of equipment, preference should be given to boxes that have a frame with DIN-rails installed on it inside. If it is easy to mount 2-3 automatic machines in the installed switchgear, it is difficult to connect 5-10 and more. In this case, the frame is taken out, installation and connection are made on the table, and it is installed back.
How to choose modular equipment in the electrical panel
The equipment installed in the electrical panel is chosen primarily by the total current of the devices connected after the specific protection devices.
The current of the circuit breakers must ensure the operation of all appliances simultaneously, but not exceed the allowable current for the wiring.
For example, the total power of the appliances is 5 kW. The total current of these appliances will be according to the formula the rated current of the circuit breaker must not exceed this value, otherwise there is a risk of overheating the cables and their failure.
Allowable current RCD and voltage relay for reliability is chosen greater than the current of the circuit breaker, which is in the same circuit with it.
In addition, the assembled electrical panel is installed sockets, ammeters, starters to turn on the electric heating and other equipment.
Assembling and mounting the switchboard on the wall
Mounting the starter panel on the wall is done in two ways - externally, or overhead, and internally, or mortise. Once the box is in place, the electrical box is assembled.
External mounting.
This is a simpler method, but less aesthetic. In addition, there is a risk of mechanical damage to the panel in operation. Such installation is performed as follows:
- an empty box without an external cover is placed against the wall and through the mounting holes mark the places of installation of dowels;
- in the marked places in the wall drill holes and hammer plastic parts dowels;
- The box is placed against the wall and dowels are hammered into the fixing holes.
If the panel is large and metal, then anchor bolts are used instead of plastic dowels.
Interior installation
Internal installation is more complicated, but the result is of higher quality:
- the box is placed against the wall, and its contours and places of entry of cables are marked;
- Use an angle grinder or a hole punch to cut out the recesses for mounting the electrical board and suitable cables;
- dowels or anchor bolts to fix the cabinet in place;
After installation, assembly and connection, the gaps around the switchboard are filled with putty, cement or foam. You can assemble such a starter panel with your own hands or buy ready-made.
How to assemble a scheme of an electric board
Assembling an apartment plastic starter panel from a few circuit breakers is made on the site of installation, but when assembling the circuit diagram of an electric box for a private house, consisting of a large amount of equipment, it is more convenient to do it on the table.
To connect the upper terminals of the circuit breakers in the switchboard for electrical wiring, it is convenient to use special combs. They come in one, two or three pole. It depends on the number of phases of the circuit board.
The order and rules of installation of all types of electric boards and the assembly of electrical circuitry with your own hands does not change:
- when connecting the circuit breakers and protection devices of the electrical board in the house, the appropriate wires are connected from above;
- no more than two wires, wires with different cross sections, or both rigid and flexible wires are connected to the same terminal;
- the cross-sectional area of the jumpers must be equal or greater than that of the cables.
- wires differ in the color of the insulation - neutral wires are blue, and the phase wires are brown.
With minimal wiring experience, you can assemble an electrical box with your own hands without any problems:
- According to the wiring diagram, the equipment is arranged. There are two options for arrangement - by importance (first all inputs, then RCDs, etc.) and by direction.
- The places for installation of busbars are marked, and the required length is cut off. The ends of the comb bars are closed with blanking plugs.
- From the lower terminals of the main circuit breaker, the phase and the zero are "distributed" to the equipment connected after it. To do this, cut off pieces of wire of the desired color and cross section of such a length that perpendicularly, without tension fit into the terminals.
- Phase and ground distribution can be made by jumper wires from PV3 wire segments of the appropriate color.
- Connection of the assembled switchboard is performed. When installing at the place of installation, connect a suitable cable, and when assembling the switchboard on the table with a piece of cable and a plug. The input circuit breaker is switched on, and then all the protection devices. Check the serviceability of the RCD by pressing the "Test" button.
- Use the tester to check the presence of voltage on the terminals to which the outgoing cables are connected.
Important: According to the new rules of PUE, it is forbidden to clamp stranded wires in the terminals. To do this, special ferrules NSHVI are used.
Adjustment and operation of the switchboard
After the electrical panel is assembled and the electric board is installed in the apartment, all circuit breakers are set in the "off" position and start the commissioning work:
- Before you check the panel, you must connect the electrical devices - sockets, switches, lights and high-power consumers.
- Apply voltage to the electrical panel and use a tester to check the correct connection of phase and zero.
- RCDs and flame arresters are turned on, then press the "Test" button to check their performance.
- The tester checks the voltage at the output of circuit breakers.
- Powerful electrical appliances are switched on. There should be no sparking and no heating of the appliances.
- Voltages in the sockets are checked.
- The lighting is checked.
- In this mode, the electrical panel should work for several hours.
- If there are small children living in the house, the switchboard is closed with a lock.
If the tests are successful, after the installation of the electrical switchboard in the apartment, it is closed with a lid with a glued circuit diagram of the electrical switchboard. If the electrical panel layout changes during the adjustment process, this is noted on the drawing.
All empty spaces in the cover after the assembly of the switchboard is completed, are closed with blanking plugs.
The switchboard is not a "put it and forget it" type of construction. After the installation of distribution boards, they require periodic monitoring:
- After a month of use, the switchboard is opened and the terminals in it are pressed.
- Adult occupants of an apartment should be told about the rules of operation of the electrical distribution box and how to proceed when the protection is triggered.
- Once a month check the serviceability of RCDs and flame arresters installed in distribution boards is repeated.
Even a novice electrician can assemble the switchboard himself. Therefore, the installation of the starter panel is available to anyone who is "friendly" with a screwdriver and pliers.
Related articles:
